

Divers, rally drivers and table tennis experts. Behind every Leatherman employee is an individual chasing their passions.
For Seth Durham, our Sr. Operational Excellence Manufacturing Engineer, that outlet is building tables by hand from reclaimed Oregon wood.
We recently sat down with Seth to learn more about how he fell into woodworking, his favorite multi-tool, and why you should always let the last coat of oil dry fully before applying polyurethane to the finish.

Thanks for taking the time to chat with us, Seth. Can you tell our readers a little about what you do here on the OpEX team here at Leatherman?
As a member of the OpEx team, my work has a deliberately wide breadth. Our team’s mandate is to support production through project management, capital deployment, and systematic improvement through CAPA’s and similar organizational tools. We’re also developing as an internal automation development team. In a general way, we are responsible for taking a step back from simply executing improvements and moving to understand and improve the systems we use.
I’m personally managing new equipment installations in the knife blade, components, and jaw departments. These installations will bring automation and improve the quality of work for our operations team. During the layout reviews of these installations, we harmonized multiple installations and reduced the number and complexity of equipment moves required by coordinating with multiple project teams. Recently, I’ve designed a new robot end effector that significantly reduces changeover frequency in some of our processes. Our team contributes with direct, technical asset creation, project management, and quality improvements.
What’s been your favorite project you’ve worked on so far?
Without discounting the others, I would lean on our Taperlock Automation project. Soon, we’ll be implementing a fully automated parts manipulation solution that will allow the area’s operators to step away from an ergonomically demanding, highly repetitive loading operation. We expect the implementation to reduce the risk of injury, increase the area’s throughput, and provide flexibility in scheduling. I love to see an impact like that, when our operators’ work comfort, content, and complexity can all improve together.

Let’s talk tables. How did you get started making these? What was the learning process like?
I’ve always had an interest in woodwork, though it has waxed and waned. My father always had tools around, some he’d collected, some from his father and grandfather. He’s got a table his great grandfather made. So, I suppose it’s a tradition!
When I was a kiddo, Dad had my brother and I help him stick build a garage at our parents’ home in Kentucky. With the Scouts, we took a primitive woodwork class on bowyery [the making of bows for archery] that has always stuck with me. I had a woodwork-hiatus from then (late high school) until the last few years. I suppose it was around 2017 that I met a master craftsman in Medford, Oregon who had the patience to give me some tutelage in the harvesting process.
The first slabs I had, I’d bought from him for resale or for projects. These things take years to air dry, so you’ve got time to figure out a few things you’d like to put together before they’re ready. I’m the kind of guy who tends to go whole hog on things like this. I was thinking, “If I’ve got to age one, I could age 10 without giving up any more space. Might as well get a stack going!” So, I did. Some he had cut, some that I’d cut, some we cut together. A year or two later, I had 4 saws, an 8’ mill, and a driveway full of lumber that people could check out and buy. I harvested from the only coastal redwood stand in Klamath County (that I’ve ever heard of at least). We also built a dehumidification kiln.

“Pictured is my father John Durham. The builders name is Henry W Burnett born 8-15-1856. Died 2-19-1945. That's my great great grandfather.”
Over the next few years I milled, dried, and sold a lot of slabs in the Klamath Basin. I was closing a transport business and teaching high school, so I’d found regrettably little time for my own projects. To that end, I’d have to call the learning process ongoing! I’ve flattened many slabs for customers, but most folks like to do the finishing themselves. The table here in the OpEx office is one of the first I’ve finished all the way through.
I expect to keep finding things out about this process, as long as I keep at it. Just the prep has taken years to get down to nice slabs ready for work. I’ve dried slabs and cracked them through, I’ve dropped a log onto a guy’s shed (Still sorry, Fred!), I’ve infested clean stacks of wood with beetles, and I’ve cut the most beautiful walnut log into ribbons (shaped that way at least) because I didn’t understand the wood’s behavior.
Ultimately it’s too much fun when it works out, so the knock(t?)s along the way are just part of the story.


Walk us through the general steps to make one of these
General steps to create a table
1. Fell a tree
Generally, this would be at someone’s residence and the work is done by others. Our favorite trees are urban harvests that would have otherwise gone to the chipper. Usually this costs the homeowner as much or more than the felling operation. So, we get the call when a friendly arborist sees a nice tree in good condition.
2. Limb the tree, and slab the log
This is where I drop in. I limb with a Stihl 362 then use one of 3 chainsaw mills from 30” to 96” depending on the size of the log. I usually like to carry out the log bucked (to length) with the bark on. Sometimes this can’t be done, and we’ll mill the log onsite. Chainsaw mills can go anywhere, at the cost of some material and a few quality concerns vs. a bandsaw mill.
3. Dry the slab
Air dried slabs take 2-5 years to dry. I have a kiln in Klamath Falls we use to accelerate this process down to about a 1 year maximum. With the kiln, we can kill any pests, but the process is sensitive to a ton of incoming variables. It’s tough to get a consistent output, so the material has to be monitored every day.
4. Flatten the slab
Almost every slab has a cup, bow, or crown. We cut about as flat as we can, but as the material dries the uneven shrinkage creates stress in the material. After the water content at the center of the slab has been minimized, we can cut both sides of the slab to create flat and parallel surfaces using a router sled. This is the most dramatic change. Dried slabs look old, molded, and rotten. Flattened slabs look like craft lumber begging for a finish.
5. Clean up cracks, knots, and gaps
This is generally where I use the LTG saws. Epoxy can bond easily to clean wood with a rough surface, but it has a tougher time with loose or shedding material. Scratching the surface lets the glue bond to more surface area, decreasing the risk of breakout during machining.
6. Fill as needed with epoxy
I mix up some short-cure epoxy and dye it, usually black. That’s used to make a fully flat surface without gaps. Wouldn’t want the cocktail glass to take a dip and twist!
7. Rough and finish sand
After the cavities are filled out with epoxy, I chisel it close to the wood surface and use a spoke shaver and scraper to get right down to the surface. Then I sand with an orbital, progressing up through 400 grit.
8. Apply finish
At this point, it all branches out depending on which finish you’re using. So far, tung oil is my favorite, but there are many oiled finishes. The hardening process usually involves some kind of oxidizing polymerization, so it takes a long time to finish. The madrone slab in the OpEx lab was drying for about 6 weeks. Circling back to learning the process, I didn’t wait for that last coat of oil to dry fully before I mixed some polyurethane onto it. Won’t do that again!
Natural oils can be refinished without being abraded in many cases, so these tend to last many years if well maintained. One of these days the lab table will need some more oil, and we’ll get those last bubbles out of the finish (I think!)

Tell us a little more about using the saws. Which multi-tool is your go-to for working on these? Or which multi-tool would you recommend for woodworking?
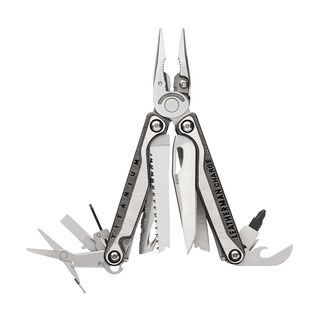
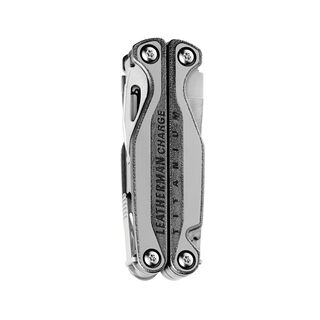
A Charge® TTi tends to be my most common daily carry. It has a saw, so when I reach for one, that’s the guy. The pliers are handy if you run into an inclusion like a nail or rock while cutting the slabs and the screwdriver can tighten or loosen the chain.
The saw is the real gem though. For that roughing step where we’re thinking about the strength of the epoxy bond, it’s the tool of choice. A chisel tends to make a much larger gap with a smooth surface or alters the shape at the entrance of the gap. Most other dedicated saws are too large to fit or need access from both sides like a coping saw.
The Charge saw can be torqued into the inner walls and miss the surface, roughing the inside of the feature and cleaning out any loose material. If there’s a comparable dedicated tool, I haven’t found it. The saws are strong, sharp, and flexible enough to reach and cut these areas into a great, even pattern.
There’s a part of me that would like to see a chisel on a FREE® to make a nice use of that hammer surface, but I haven’t gotten around to building one out yet. Till then, it’s the Charge for me.
Thanks, seth!
A huge thank you to Seth for sitting down with us to talk tables. To hear more from our engineers check out Engineering Never Ends where we find out what happens after a product is released. Or watch as Tim Leatherman himself explains the origins of the orginal Pocket Survival Tool in Engineer Explains: The PST®.
Related Products


As part of a first aid kit
It’s one of those things you hope you won't need. But it’s vital to have a first aid kit when camping. In a first aid kit, it is important to include tools such as pliers or tweezers for removing splinters. Splinters can be painful and difficult to remove without the proper tools. so having a pair of pliers or tweezers on hand can make the process much easier and less painful. Additionally, scissors are essential for cutting bandages to the correct size or for removing clothing in case of injury. Scissors should be sharp and easy to use in order to quickly and safely address any injuries that may occur. Having these tools readily available in a first aid kit can help ensure that you are prepared to handle any minor injuries that may arise.