How to build, start, and enjoy a fire in any condition
Leatherman's Ultimate Guide to
Campfires:
Leatherman's Ultimate Guide to
Campfires:
With Teddy Cosco
There's nothing like a cozy campfire to warm you up, cook your food, and create a relaxing atmosphere. But starting a fire is not always easy, especially if you don't have the right tools or know-how.
In this article, you will learn all about campfires, including the best materials and methods, common challenges, and solutions.
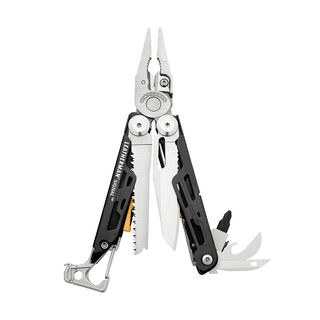
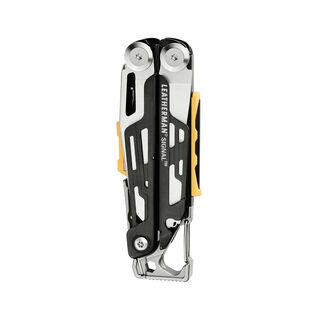
How to start a fire with a Leatherman Signal
In this video, wilderness expert Teddy Cosco starts a fire using only a Leatherman Signal. That's right. No matches, no lighter, just our favorite outdoor multi-tool.
This is a good survival skill to have in your back pocket just in case. But, its also a fun way to pass downtime around the camp site.
1. Gather Materials
Along with a safe place to start a fire you’ll need:
- Leatherman Signal
- Wood cut to different sizes: tinder, kindling and fuel (read below to find out the difference)
- Dried moss, paper, birch bark, or other highly flammable items
- Water just in case

2. Assemble log cabin fire
There are many different style of campfire, in this video Teddy builds a log cabin-style fire. This is a great style of campfire for both illumination and warmth. Read below for more on types of campfires and why this is Teddy’s favorite.
1. Lay two pieces of fuel parallel to each other into the fire pit.
2. Then create the classic cross-hatch pattern using the kindling, you can even put a few feather sticks on top of the first layer. The key is to have enough air flowing through that the flame can catch and enough surface area that the flame has a place to go
3. Keep layering in a cross-hatch pattern going slightly bigger with each layer. You can even add pieces of fuel on top
4. Finally lay a few pieces of fuel right on top
3. Create the spark
Remove the ferro rod from the Leatherman Signal and open the saw implement. With a firm grip, hold the ferro rod at a 45-degree angle and press down firmly with the back of the saw blade against the stationary. Aim the spark into the center of the ball of dried moss (or whatever highly flammable item you have on hand) until the spark catches.
4. Place the flame inside the log cabin structure
Nurture the tinder ball with a little bit of air then put the tinder ball right into the center of the log house. Now the flame will begin to build as it has access to oxygen and fuel.
And that's how you start a fire with the Leatherman Signal. Starting a fire with the Signal is a fun and easy way to use our outdoor multi-tool. It can be used for survival or impressing your friends.
Types of Campfires
There are many ways to build a campfire, depending on your purpose, preference, and environment. Each kind of campfire has its own advantages and disadvantages and requires different materials and methods. Here are some of the most common and popular kinds of campfires, along with their pros and cons, and a few tips on how to build them.
Best campfire for long lasting warmth and light

The Log Cabin Fire
This is the kind of fire Teddy creates in the How to Start a Fire with a Leatherman Signal video. A log cabin fire provides a good amount of warmth and illumination, has a sturdy structure, and is well suited to creating a consistent bed of coals for cooking. Combined with how easy it is to build, the log cabin is a solid choice in most situations.
This style of fire is particularly well suited to building fires with rounds, i.e. whole logs, that have been split with an axe. This generally yields straight pieces that can be cut into similarly sized pieces. By having evenly sized pieces of wood you can create a stable structure for your fire. If you are gathering twigs and sticks that are less consistent in size, your log cabin may be lopsided or prone to collapse.
If you’re cooking food over your fire either with a grate or even with a marshmallow stick, this is a great style of fire because it provides even heat and burns down to a consistent coal bed.
The pyramid fire
This is a kind of fire that's great for cold and wet conditions, as it creates a lot of heat and light, and it can burn damp wood because of the high temperature at which it burns. It's also good for making a large fire that burns for a long time, without much maintenance. However, building a fire pit requires a lot of wood and effort. It may not be ideal for cooking because it does not produce a consistent flame or coals.
To make a pyramid fire, lay firewood pieces on the ground close together in parallel lines. Then, lay some more pieces of firewood on top of the first layer, perpendicular to it, and slightly smaller than it. Repeat this process, adding more layers of firewood, and alternating the direction of each layer, until you have a pyramid shape.
The top layer should be the smallest and should consist of tinder and kindling. Light the top layer, and let it burn downwards, igniting the lower layers.
Best campfire for simple camp cooking
the upside down fire
In contrast to most fires where you have the the tinder at the bottom, then the kindling, and then the fuel at the top, the upside-down fire does the exact opposite. To build this fire you basically to the exact opposite of the log cabin. Starting with your largest pieces of fuel, lay down a cross hatched pattern with pieces getting smaller and smaller with each layer ending up with your tinder on the very top of the pyramid shape. To light this style of fire you actually light the very top and let it burn towards the ground.
This style of fire can be tricky to get going in wet or windy conditions. Because the fire burns downwards, you create a very even heat and a coal bed that is well suited to placing in foil packets of your favorite root vegetables, searing a steak on a cast iron pan, or making some spider dogs. If you are hoping to prepare a meal over the fire this is by far the best type of fire, according to Teddy, for cooking

the teepee fire
This is one of the easiest and fastest fires to build and start. It's ideal for creating a strong and hot flame, and for cooking food on a skewer or a stick. However, it also burns quickly and unevenly, and it might collapse or spread as the wood falls. To build a teepee fire, erect a teepee like structure of small to medium size sticks and twigs around a ball of tinder or newspaper.
You should expect to burn a lot of wood with this fire type, but equally this type of fire puts out the most light.
The Lean-to Fire
This is a kind of fire that's useful for windy conditions, as it protects the fire from the wind and uses it to boost the flame. It's also good for heating and cooking, as it creates a wall of heat on one side. However, it also requires a large log or a rock to act as a windbreak, and it might not burn very long or evenly.
To build a lean-to fire, find a large log or a rock, and place it on the windward side of the pit. Then, stick a long piece of kindling into the ground, on the leeward side of the log or rock, at a 30-degree angle. Lean some more pieces of kindling against the first piece, forming a tent shape.
Place some tinder under the kindling, and some firewood behind the kindling. Light the tinder, and let it burn until it ignites the kindling and the firewood.
These are just some of the many kinds of campfires you can build, but there are others, such as the star fire, the crossfire, the keyhole fire, and more. You can experiment with different kinds of campfires and see what works best for you and your situation. The most important thing is to stay safe, have fun with it, and to always respect the fire and the environment.
Materials Needed for a campfire
No matter what kind of campfire you choose to build, you'll need some basic materials to make it happen. These are the materials we talked about earlier.
Make sure to always bring them when you go camping or hiking. They are: tinder, kindling, firewood, an ignition source, and water. Let's look at each material to understand what it is, why it's important, and how to get or create it.
First, let's clear up the difference between tinder, kindling and fuel.

Tinder
Of all the burning materials, tinder has the greatest surface area to mass ratio, that is it has a lot of wood exposed, but doesn’t weigh very much. Examples include dried moss, cedar bark, birch bark, , or feather sticks. Tinder should be dry, and fine, so that it can ignite with a spark or a flame.
Some examples of tinder are dry grass, leaves, bark, pine needles, cotton balls, dryer lint, or paper. You can find tinder in nature, or bring it with you from home. You can also use the Signal's saw to shave some wood shavings from a dry branch or log, and use them as tinder.
Tip from Teddy: keep tinder on hand in a waterproof storage bag or container so it is always ready when you need it. His favourite tinder is toilet paper, which you should always have on hand anyways!
kindling
Kindling is the material that helps the fire grow, and that you use to build your fire structure. Kindling should be dry, thin, and brittle, so that it can catch fire quickly and easily.
Some examples of kindling are small sticks, small twigs, pine cones, or wood chips. You can find kindling in nature, or bring it with you from home. You can also use the Signal's knife or saw to cut or split some larger pieces of wood into smaller pieces of kindling. Each piece should be the same diameter as your thumb or smaller.
Fuel or firewood
This is the material that you use to keep your fire burning rather to get it going in the first place. Firewood should be dry, thick, and solid, so that it can burn for a long time and produce heat and coals.
Some examples of firewood are larger pieces of wood, logs, or branches. You can find firewood in nature, or buy it from a store or a campsite.
Some types of wood burn better than others. Hardwoods like oak, maple, or beech, which burn longer and hotter than softwoods like pine, fir, or cedar, which burn faster and cooler. However, softwoods are easier to ignite and split, and they produce more flame and less smoke than hardwoods.
Tip from Teddy: if the wood you have on hand is wet, once you get your fire going dry out your fuel logs by placing them close enough the fire to evaporate the moisture, but not so close that they catch fire.
Ignition Source
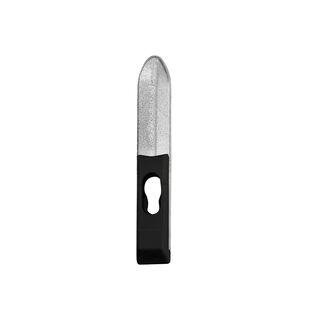
Your ignition source is the tool ordevice that you use to ignite your tinder, and to start your fire. Fire starter can be a waterproof match, a lighter, a flint, or a ferrocerium rod. You can buy fire starter from a store, or use the one that comes with the Signal.
The Signal's fire starter is a ferrocerium rod, or ferro rod. It produces sparks when scraped with a metal striker. The Signal's ferro rod is reliable, durable, and easy to use, and it works in any weather condition.
Tip from Teddy: practice striking the ferro rod before you need it, to make sure you know how to use it properly and safely.
Water (or a water jug)
Water is what you’ll use to put out your fire, and to prevent it from spreading or causing damage. Starting your fire ear to a water source that is, abundant and accessible will help if you need to use it quickly and effectively.
You can use water from a nearby source, such as a lake, a river, or a stream, or bring it with you from home. You can also use water from a bottle, a jug, or a bucket.
Tip from Teddy: before you leave your campsite or go to bed at night, pour water on the fire until it is cold to the touch. This will require more water than you think.
** Tip from Teddy: Although it may make sense at the end of the night to pee on your fire to put it out. Don’t. It will reek and the person who has start the fire the next day will likely be unimpressed.
Special Circumstances
Building and starting a campfire is not always easy. Snow and rain can make your fire more difficult to ignite, maintain, or control. In this section, we'll show you how to deal with some of the most common and tricky special circumstances.
How to Start a Fire in the Snow
Snow can be a beautiful and fun element of nature, but it can also be a problem when you want to start a fire. Snow can make your fire site wet, cold, and unstable, and it can make your materials damp, frozen, or buried. However, snow can also be a useful resource, as it can provide water, insulation, and reflection. Here's how to start a fire in the snow, with some help from Teddy.

Find a Suitable fire site
Look for a spot that's flat, dry, and sheltered from the wind. Avoid areas that are near trees, rocks, or slopes, as they might have hidden hazards, such as branches, ice, or avalanches.
Clear the snow from the ground, and dig a pit until you reach the soil. If the snow is too deep or hard, you can also pack it down, and create a platform for your fire.
find the best wood you can
Try to find wood that does not have snow on it, either from the middle of a stack or collected from under trees. Moisture is your enemy, so avoid wood that is water-logged, snow-covered, frozen, or has been directly on the ground.
Prep some kindling of varying sizes and stack it up in an area where there is no snow (or clear the snow away). You’ll want a bunch of very small kindling as it ignites better, and you’ll need that heat to burn off any moisture.
Pro tip: wood in the middle of a log is generally drier than the exterior of the log, so use this first. (The Signal’s saw will be useful for this step.)
Look for tinder, kindling, and fuel that are dry, exposed, and above the snow, such as dead branches, pine needles, or bark. Looking at the bases of trees in an excellent place to source tinder and kindling.
Avoid materials that are wet, green, or under the snow, as they might not burn well, or at all. Use the Signal's knife or saw to cut or collect your materials. Keep them in a dry place, such as under your jacket, or on a tarp.
You can also use the Signal's fire starter as tinder, or melt some snow with a pot and a stove, and use the water to soak some cotton balls or paper, and use them as tinder. Use wood you intend to use as fuel as a base.
Prep some feather sticks with the driest pieces you have. Before lighting the fire, try to clear out as much snow from the area as possible and use a piece of wood that has been cut to be flat as the base of your fire.
Try to get some elevation by laying down a layer of wood upon which to start your fire.
Keep it fed
From this point, you can build your fire as you would in warmer climates: gradually add pieces of increasing size to the fire. When the fire is burning well, put damp logs close to it to dry them out.
This will help them burn better when added to the flames. This will reduce some of the moisture in the log and/or melt some of the snow. This provides a better burn and less smoke once you put it on the fire.
how to start a fire when everything is wet
Expand Your Search
Building a campfire with wet wood can be especially challenging. Wood that’s been exposed to the elements is likely to be pretty wet, especially if it’s been raining hard for a few days. Solution: seek out wood that has been sheltered from the rain under heavy brush, trees, and other natural coverings. You can usually find some decent kindling if you stick very close to the ground. Test out how dry pieces of wood are by grabbing them with a bare hand.
If you can scout out a dead tree that hasn’t yet fallen over, you may have hit the jackpot. The lower branches could be dry, if they’ve been somewhat protected. Snap them off and thank your lucky stars.
Remember the Basics
Most fires start with some teeny tiny tinder, are built up with kindling, then the larger sticks and logs come into play. A fire built in wet conditions is no different—but the first few steps are really crucial. Gather plenty of small tinder—more than you think you’ll need—and be patient. Where does this dry tinder come from? We’ll get to that in a moment.
Get everything set up before you even attempt to light the fire. A teepee style is a solid go to—just be sure to add plenty of tinder and kindling by the bottom. Remember that oxygen is a key component a roaring fire, so incorporate lots of room for airflow in your basic structure.

Hack Away
Wood that feels wet to the touch might not be a lost cause after all. Using one of your favorite campfire tools, strip the wet bark off of a stick to expose the dry inner layers. Peel this dry wood into wood shavings—voila: the perfect tinder!
This technique works for larger pieces of wood, too. Use a hatchet to split larger sticks and logs for access to the dry core.
Bring in Some Help
This one requires a little foresight: if the weather forecast is looking a little dicey, throw some pre-made fire starters into your pack. It’ll give you an initial boost to get a decent fire going.
You can pick up various types of fire starters at any camping or outdoor store, or you can DIY it easily: coat cotton balls with petroleum jelly (i.e. Vaseline) and keep them in a zippered plastic bag. This weighs next to nothing, but it’s easy to light and the petroleum jelly keeps it burning for awhile.
Dry It Out
It took a little ingenuity, but you have finally succeeded at starting a fire in wet conditions. Now, you just need to keep it going. Place damp pieces of wood along the perimeter of your fire. The hot flames will help dry out the wood, which can later be added to the fire.
author bio
Teddy Cosco is an associate professor at Simon Fraser University, a passionate outdoorsman, enthusiastic home cook, and sometimes-lucky fly fisherman. Exploring the tundra via floatplane, fishing off the coast of Alaska and camping throughout Western Canada, he grew up with the outdoors in his blood. Follow @castandiron for adventure and recipe inspiration.